
Things are moving along at 4600 Augusta Ave: all of the windows and doors are in, and we’re quickly approaching the time to insulate. Pinning down the best method for insulation has been a surprisingly difficult process… while building science reports have increasingly advocated tight full-home conditioned envelopes using unvented roofs and conditioned attics, we’ve found contractors to be generally skeptical of the spray-foam technique, citing the lack of ventilation along the sheathing as cause for concern about shingle temperature and degradation. Shingle manufacturers themselves have expressed confidence in their products in the assembly; however, given the degree/prevalence of contractor pushback we decided to throw this one over to the R&D department here at R. Michael Cross | Design Group, and enlisted the invaluable help of Guy DuBois of Commonwealth Building Sciences for a sort of case study to examine the effect of underside ventilation (or lack thereof) on roof surface temperature.
To break this down a little, I should explain that vented attics were mandated by code for years as a means of preventing roof damage resulting from trapped moisture. In this method, insulation gets put down between the second floor ceiling joists, vents are installed in the eaves and gable ends, and the attic is left essentially unconditioned. There are a few main thoughts behind the original mandate: preventing the buildup of moisture during the colder months by allowing it to escape, and preventing ice damming at the eaves in the winter by keeping the entire roof cold. Dominion Power further explains:
At some point, the original purpose for attic ventilation was forgotten and/or replaced, in cooling climates, with the belief that it was to reduce roof and attic temperatures, thus lowering cooling expenses and increasing shingle life. This was further compounded by the leap of faith that increased or powered ventilation would be even better. While sounding logical, there is simply no research to validate it. In fact, scientific testing has shown that attic ventilation has almost no effect on roof surface/ shingle temperatures and very little effect on attic temperatures.
While Dominion’s research would seem to answer our question… we decided to move forward anyway. Because we’re scientists, dammit, and we need some of that good empirical stuff.
The key to unvented roof assemblies and conditioned attics is managing the temperature of the first condensing surface either with rigid insulation on top of the sheathing, or with an impermeable barrier of spray foam insulation adhered directly to the underside of the sheathing. In the case of rigid insulation, this keeps the condensing surface at the roof sheathing sufficiently warm (45°F) to minimize or prevent condensation. In the case of applied spray-foam, this moves the condensing surface from outside of the insulation (the roof sheathing) to the inside of the spray-foam, which is essentially self-insulated by the rest of the foam behind it.
This method of keeping the condensing surface below significant insulation also allows the exterior roof surface to remain relatively cool, preventing ice dams. Furthermore, the absence of direct attic ventilation helps minimize uplift pressure in high wind events.
To study the surface temperature performance of unvented roof assemblies compared to unvented roof assemblies, we constructed two 2’-0” x 4’-0” mockup sections of roof, one with two inches of spray-foam applied directly to the sheathing, one without.
From there we set the roof panels up at a 12:12 slope and set up matching heat lamps (250 watts). Guy spent some time calibrating the whole set-up, making certain both panels received equal heat exposure. After heating both panels for about 15 minutes, the heating lamps were turned off and initial surface temperature readings were taken.
We found that both panels had a surface temperature within 1°F of 181°F. We chose to continue measuring at intervals over the next half hour to see if the panels rejected surface heat at the same rate.
Ultimately, the panels performed almost identically, with the unvented panel cooling slightly slower, presumably because of the foam’s thermal mass. Measurements taken behind the panel showed an expected but marked difference in hot spots, with the insulated panel performing significantly better.
We admit that this investigation could have been more controlled, and that the panels may not exactly reflect the performance of an actual enclosed roof assembly; however this was a helpful exercise in essentially pointing towards a confirmation that unvented roofs won’t melt your shingles off. At the end of the day, we believe the positives of an unvented spray-foam assembly present a better solution for residential roofs in most situations.
We wish we had somewhat more conclusive results, and may still pursue further tests on these panels. In fact, we’d love to hear any of your suggestions and ideas for testing methods, or even general questions that you don’t think we have addressed. You can also email us at blog@rmichaelcross.com.
| ETM

|


evan
Filed Under:
Tags:
Deltatemp,
Ductwork
CLICK IMAGE FOR GALLERY
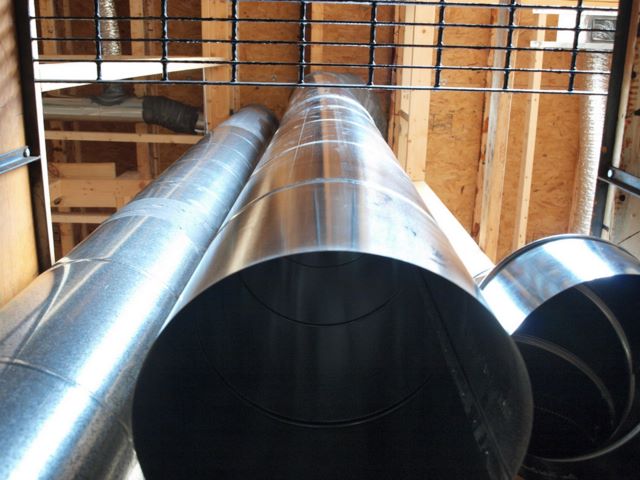
A quick post on ducts: they are in. Be sure to check out Michael's images, which some describe as "happier" or "more vibrant" or "less Jersey" than mine. Well... so be it.
Deltatemp came back today to install the ducts. We designed a large utility chase into the house to allow the various systems to efficiently serve the two floors, and Deltatemp has installed an open system which will treat the chase as a return plenum instead of ducting return air from specific locations. If you look through the pictures you'll also notice the- uh- triple sealed duct joints - tape, then two coats of mastic- to pretty much eliminate air leakage. Also please note the particular care we've taken to make the ducts too small for spies, ninjas, most aliens, and/or Tom Cruise. Dennis Quaid a la Innerspace would have a go of it though- sans Martin Short, natch- until the MERV 13 filters... then he'd be stuck.
Thanks for reading. We'd love to hear comments, questions or suggestions either in the comments section or you can email us at blog@rmichaelcross.com
|

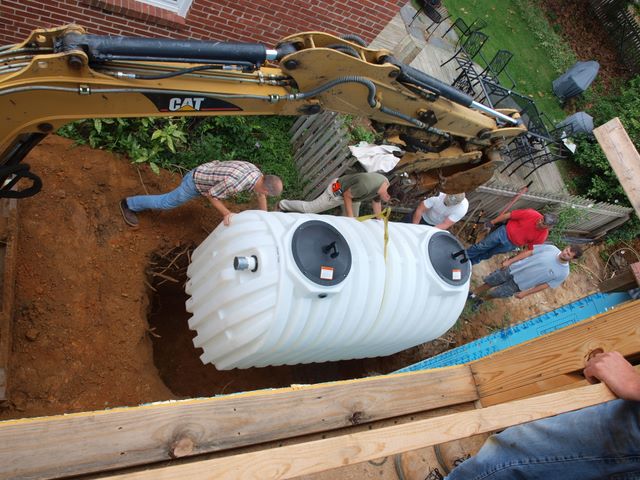
So when we drew up the site plans for this house we sketched out a 150 foot line around the property for the geothermal trench. On the computer screen it's this nice tidy straight dashed line that pretty much just goes around the perimeter. Well - as it turns out - trenching 150 feet of dirt 5' wide by 5' deep is a substantially more, uh, brutal process than previously acknowledged on this side of the keyboard.
There is dirt everywhere- or at least, there was dirt everywhere. It's all back in the trenches now. Here's the process:
1. Dig this hole.
2. Lay tubing.
3. Fill hole.
Marty and his crew from Deltatemp did a great job explaining the process (in much more detail than I) and science behind geothermal heating/cooling. Everyone on the crew was ready to help explain, and after a little while I could see why: people driving, walking, biking by all seemed to have a specific curiosity about the geothermal system. Sure, they see the house, it looks neat, and they come in for a closer view, but what they really want to know about is this sign in the front yard that says "this house is cooled by the earth". Even our framer has been fielding geothermal questions for a week or so now. Again, it really speaks to this issue of the common building lexicon: most people don't question a condenser in the back yard, because that's just the way it is. Well, geothermal turns the back yard into a big condenser I guess.
Essentially, during the summer a heatpump absorbs the heat from your house and expels it to the outside air outside through a heatsink (generally a fan blowing through some metal fins). Just like this friendly DINOSAUR:
This is pretty inefficient, mainly because the outside air is already hot, otherwise you wouldn't have the air conditioning on. Also, note that dinosaurs died of bad design.
A geothermal heatpump absorbs the heat from your house and transfers it into the ground via a water loop running about 5' below the surface. The ground temperature at this level is fairly steady between 50-60 degrees. Waterfurnace has some diagrams here. NONE of these diagrams have dinosaurs.
I tried to get some shots of the process of laying and splicing all of the geothermal tubing, check them out in the gallery. We also had some more filming going down- I'll give more details on this when there's more to tell. And someone found a shirt sleeve. And a road.
Actually, I'll go ahead and talk about that a little, because I always hear about these ancient cities found beneath other cities, and my response is typically "did they not notice the other city there or something? How is this possible? Gigantic dirtblizzards?" But right here in the not sooo ancient Near West End of Richmond, Virginia, the big yellow machine is just cold digging up yard, and a couple of feet down hits... a road? The old roads are already a couple feet down.... I guess the term for this would be palimpsest. Now that's a real $0.20 word.
"Green Drinks is a simple and unstructured event where people interested in sustainability can get together to network, talk shop, learn something new, share something innovative or maybe even find a job! It's a great time to chat with folks you know or to meet new ones."
The next meeting is August 20th at The Camel, and is a great resource for Richmond. Mark your calendars.
Have a great weekend everyone!
Thanks for reading. We'd love to hear comments, questions or suggestions either in the comments section or you can email us at blog@rmichaelcross.com
|
Apologies for the delay in posting; it's been a busy week. As you can see in the photo, the second floor and the roof are already up with the blue SIS (Structural Insulated Sheathing) panels. Look through the gallery for more progress photos; while we didn't get any posts up, we still manged to get out and take pictures a few times this week.
This week has really illustrated that a huge part of designing "green" is really just designing accurately and economically. More on this later. Everyone enjoy your weekend!
| ETM
Thanks for reading. We'd love to hear comments, questions or suggestions either in the comments section or you can email us at blog@rmichaelcross.com
|
CLICK IMAGE FOR GALLERY
Just a quick post to update and get some more photos up. Jeremy has framed out the first floor plate. Jeremy is a one man show, and I'm looking forward to getting some action photos up here soon: things are going to move fast over the next couple of weeks. We used open web wood joists for the spans (see gallery), which provide a lot of strength with a minimal amount of depth and material.
Everyone on this end is pretty keyed in on the prize, but for anyone else reading I thought it might be helpful to post an image of where we're heading:

This view is from Westmoreland heading towards Monument. Check the Google street view below for reference.
View Larger Map
| ETM
Thanks for reading. We'd love to hear comments, questions or suggestions either in the comments section or you can email us at blog@rmichaelcross.com
|
CLICK IMAGE FOR FOUNDATION GALLERY
Friday the foundation was poured. The whole schedule was surprisingly precise; I mean you see these guys in these big trucks, looking pretty sloppy, like a Hardee's commercial somehow, but what you don't know is that they're usually right where they're supposed to be. It's all part of this giant lumbering beast that is the construction process where the guy in the boom truck needs to get there exactly a few minutes before the concrete mixer, who is usually at some other job until precisely 3:00, and has to get this job done by 4:00 to go to another job.... So this boom truck, with its extend-o-trunk concrete hose shows up and - no joke - has 'schwing' painted all over it. Who along the management chain gave this the green light?
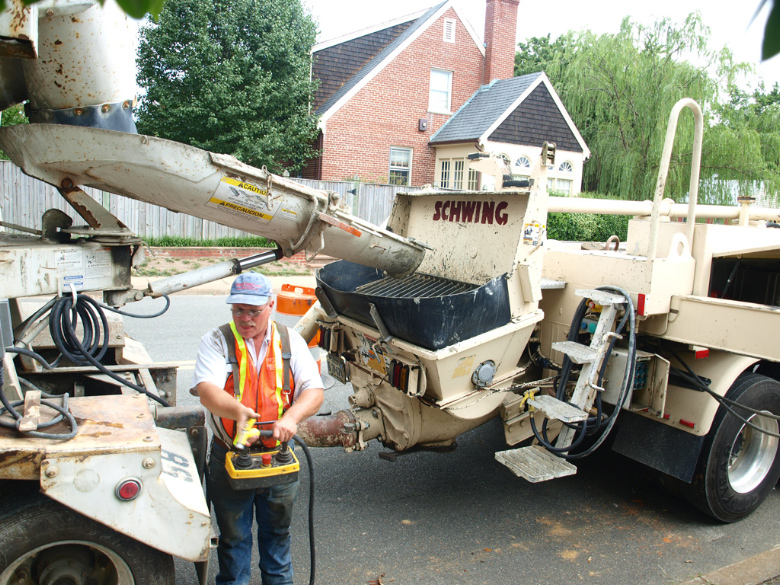
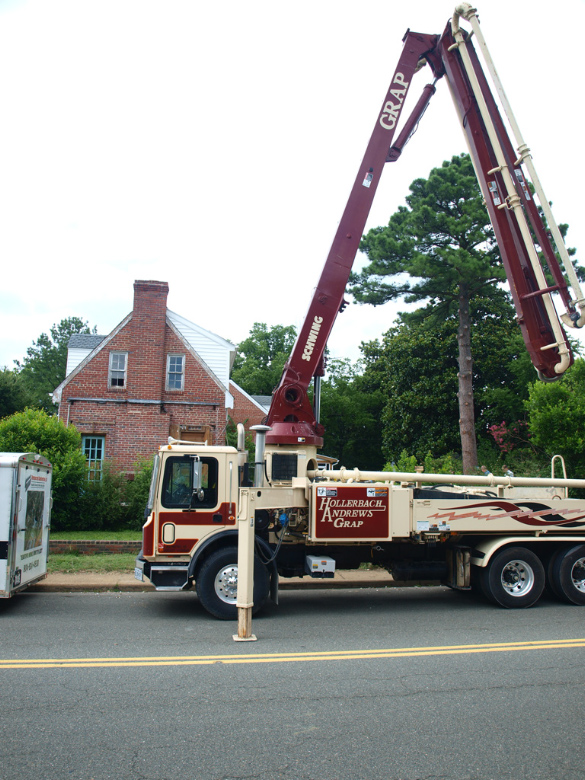
Anyway... Glenn Turner & Johnny from Thermacrete poured the concrete into the ICF forms to make the foundation walls. If you haven't heard of it before, ICF is pretty much the love child of a beer cooler and a concrete masonry unit (see gallery), so naturally we like it. The foam formwork stacks up like legos, then stays in place to provide a pretty high insulation value. The concrete we used is a 30% fly ash mixture which is apparently crazy kinds of sustainable for reasons I will let the fly ash industry explain, but alas is NOT made out of the ashes of flies.
A minor blowout in one of the ICF forms provided the drama for the day, but everyone* stayed cool and collected. For my part, I reacted by attempting to fall into (perhaps through?) the foundation and surrounding deathmoat, but only managed to drop a couple of Michael's lenses into the footing (oops!). Michael's grandfather Dick on the other hand made several impressive leaps across the footing/foundation.
After the pour Dick, Richard (Hollyport Ventures), and Michael (rmichaelcross | Design Group) - heretofore known as 'Los Tres Cruces' - scurried around with tape measures and old 2x4s and helped the Thermacrete gentlemen shim some of the forms into place. Finally we put Glenn Turner's pocket change into the wet concrete, because Italians in Long Island do this. Take THAT Freemasons!
As of today, the first floor engineered lumber has been ordered and the mason is onsite laying the face brick around the foundation. We're hoping to get a couple of renderings up to show what this thing is supposed to turn into, so stay tuned.
*not everyone
| ETM
Thanks for reading. We'd love to hear comments, questions or suggestions either in the comments section or you can email us at blog@rmichaelcross.com
|


-1.jpg)


